SEARCH THIS BLOG

Showing posts with label diy party decor. Show all posts

Tuesday, October 6, 2015

Halloween Eyeball Garland


Hey everyone! Today I am sharing a super quick, super easy and super inexpensive craft idea that will be perfect for Halloween plus it's a craft that your kids can help with or even do all by themselves. I'm guessing that it took me about 15 minutes to complete and cost me nothing because I already had all of the supplies on hand but if you didn't, I imagine it may cost you around five bucks to do! Now that's my kind of craft!

I initially came up with this idea because I had decorated my mantel for Halloween and thought to myself that I would like a little something hanging in the front but didn't want a banner or anything too big. So I looked around in my craft supplies to see if I could come up with anything quick and easy and this is what I came up with for you.


This is how to make this quick 'Halloween Eyeball Garland':

Step 1:
Gather all of the supplies you will need. You may not even have to go to the store for this as I had all of these supplies on hand. But if you do, make sure to pick up a bag of multi-colored poms (I choose a multi-color bag & picked out the green and purple ones to use), a package of these googly eyes that are small enough to fit on the poms, something to string the poms with (I prefer to use fishing line so you can't see it) and also a needle and scissors. Oh and you may want your glue gun if your package of google eyes doesn't have sticker backs but if they do you are golden. ;)


Step 2:
If you happen to have sticker back googly eyes, then just peal off the backs and stick to the poms. If you don't or are like me and want to ensure the eyes do NOT come off, just take your glue gun and add a drop before putting on the poms. Continue doing this until you have all of the poms you will need for your garland. I made 20 for mine but it could have easily looked good with more on it, it just depends what you want on it.


Step 3:
Thread up your fishing line or whatever you would like to string your poms with and then start stringing. I have found if you stick the needle in just a tiny bit from the center, it will go through a little easier and still hold the pom on the line for you.
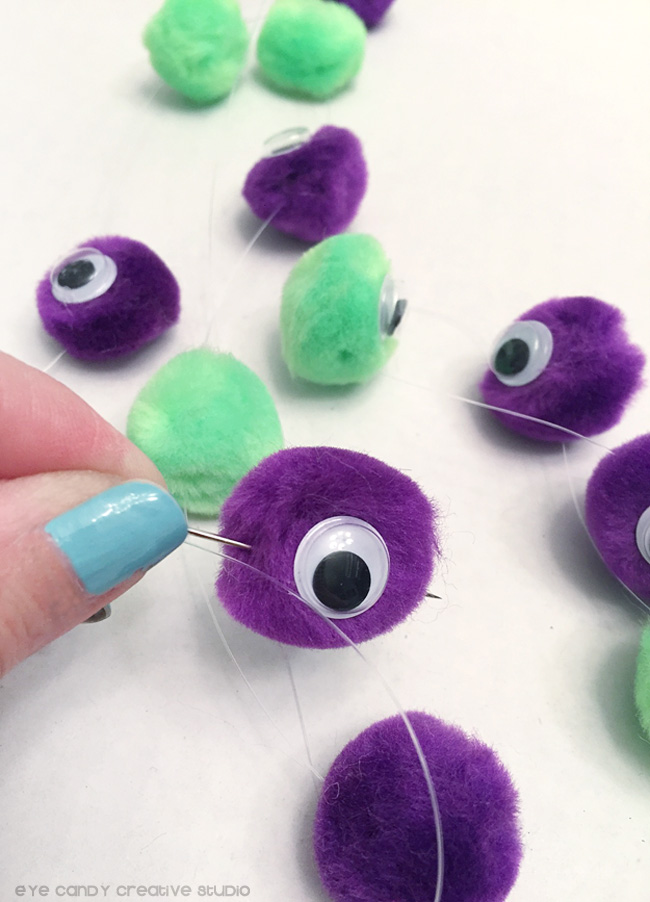


That is it. Now hang up your Halloween Eyeball Garland anywhere you like and enjoy! Told you it was quick and easy . . . so easy in fact that I think I will string some more for another place I have in mind! ;) 


I just love Halloween crafting don't you? Hopefully this will inspire you to make your own as it really is super easy & makes Halloween a little more fun!


Are you loving the "eye candy" here? 

Then join me over on Facebook, Pinterest, Twitter & Instagram or

check out my designs, artwork & decor in my Etsy shop
Looking forward to seeing you again! :)


Thanks, Laura!  That garland is scary cute!  Such a quick and easy project!  Want to see more scary delights?  Visit our 13 Days of Handmade Halloween archived projects.


Thursday, August 1, 2013

{DIY Party Decor} Bow Tie Straw Toppers & Tissue Paper Tassels

Last week I showed you how I styled a retro inspired swagged out cocktail bar.  Today, I'm sharing how to re-create some of the decorative elements that were used get that look.  First, I'm sharing how to create these adorable Ribbon Bow-Tie  Straw Toppers.
Bowtie straw flag, Tutorial, cocktail party

To start, you will need to following supplies:
bowtie straw topper supplies
Step 1: Measure out your ribbon to 3" and another at .5".
Step 1 - Bowtie Straw TopperStep 2: Using hot glue or fabric glue, add adhesive to both ends of the 3" ribbon and bring each side towards the middle, slightly overlapping one end on top of the other.
Step 2 - Bowtie Straw Topper
Step 3: Once glue has dried, pinch the ribbon closed towards the center to create a pleated look.
Step 4: Wrap the .5" ribbon around the center of the pleated ribbon and adhere with glue to create a bow.  (Tip: a clothespin is helpful during this step to hold the pleated ribbon together as you glue on the center strip of the ribbon.)
Step 3_4 - Bowtie Straw TopperStep 5: Your finished bow should look like this.  Simply add to a festive paper straw and CHEERS!
Step 5 - Bowtie Straw Topper
bowtie straw topper_on straw

Another element that was used for the cocktail station was the ever popular Tissue Fringe Garland.  I also used fringed tassels to anchor the 'cocktails' banner that was used for the drinks station.  You can download the FREE cocktails banner here.  I know that there are plenty of tutorials on how to make these and there is no wrong or right way to make them.  I've come up with several different styles of making them but the way I'm going to show you today, is the easiest for me.  The key is no more than 2 sheets of thin tissue paper :)

diy tissue fringe garland, how to make tissue paper tassels, tissue tassel tutorial
Here's how to make your own tissue fringe garland.
Step 1: You will need at least 2 sheets of tissue paper, a ruler, a glue gun and scissors.
Step 2: Most tissue paper comes folded. You can use the fold line as a guide to cut your paper in half lengthwise.
Step 3: Fold both sheets together width-wise.
Step 4: Use your ruler as a guide to begin cutting paper into strips.
Tissue Fringe Garland Steps 1-4
Step 5: Cut paper into strips up to the edge of the ruler.
Step 6 - 8: Cut again centering each cut from the last and repeat until you've cut the fringes to the width you desire.  For best results each cut should be between .5"-.75".
Tissue Fringe Garland Steps 5-8
Step 9: Unfold tissue gently.
Step 10: Unfold again, gently until you can lie the tissue flat with fringe flat on both sides.
Step 11: Start rolling up the middle of the paper all the way through to the end.  You should have something similar to a fringed 'wand'.
Tissue Fringe Garland Steps 9-11
Step 12: Gently roll and twist the center section of the 'wand.
Step 13:  Bend the twisted section in half to form a loop and add hot glue.
Step 14. Seal the end of the loop to close.
Tissue Fringe Garland Steps 12-14
You can make as many fringed tassels as you'd like, find a nice sturdy string and thread through the loops and hang!
Tissue Fringe Garland Steps 15-16

finished tissue fringe garland

I hope these ideas help you to create a swagged out space for your next bash!


(This post was written by me and  originally featured on MG Party Impressions)

Tuesday, April 23, 2013

{Blog Love} My Top Five Blog Posts of All Time

I was doing a bit of stats checking on my blog the other day and wondered what were my top five blog posts of all time.  Well, I was amazed at what came up!  I personally wouldn't have chosen these posts as personal favorites....maybe I can say only one is my favorite, the Princess and The Frog party for my daughter....for obvious reasons, but the rest, eh!  This is not to say that I think that all my posts suck.....it's just that my blogging style has evolved in the past two years, and what I'm seeing below is not reflective of where I am at today....I guess that's sort of a good thing.  In any case, I figured I'd share my critique of the posts and find out if maybe you agree!

1.  This is the top post of them all.....the recap of my daughter's Princess and The Frog birthday party. I'm guessing Tiana and her Toad are still sorta popular among party themed celebrations!  I had no idea about taking photos or anything like that.....most of the pics are blurry!  LOL What I did know was how to make things look pretty....sorta :)  Pretty party for my pretty girl!


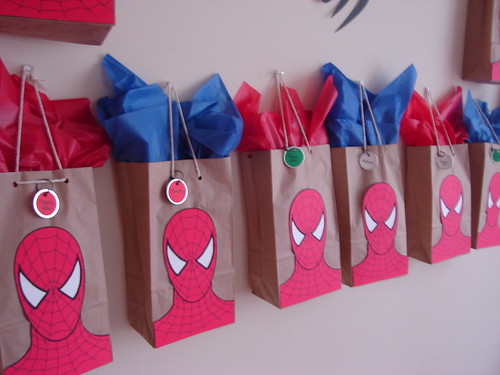
2.  Spiderman Party Recap - this was my first post EVER!  It was mainly to recap a birthday party I did with a Spiderman theme.....I was soooo overwhelmed and clueless about how to make the party fabulous that I just thought I'd gone crazy!  I am certain it's my wordiest post to date.  I do happen to like how the photos came out however, and was content with the set up of the party space - considering I'd just started party styling.  I'm guessing it's popular because most boys go through some super hero phase at some point in their young lives and parents need some good party ideas.  Also, I always get asked where I got those bags...... well, I made them myself....maybe I should do a tutorial in the future!


3. A couple years back I started playing with naming days of my posts and did one called Trendy Tuesday where I thought I'd share a new party trend every Tuesday.  Well, I kind of fell off posting new trends on Tuesdays and honestly, I can't even tell you why.....my best guess is that my real life took over and I just stopped it - although.....I still have Cupcake Monday, Pin-tastic Tuesday and Fab Friday.  In any case, this trend I was seeing with decorating with streamers led me to do a whole post dedicated to crepe paper!  Two years later I think the trend is still...trending....case in point.


4. Okay - so this post was a recap of a party thrown by my dear friends and takes the fourth spot on the list!  My friends Keri & Brian throw the bests parties for their girls and this cowgirl themed birthday party was just one of them.  This post also shares a giveaway winner announcement - if I were to write a similar post now, I would definitely note the winner in a separate post or at the end of the post.


5. For my '25th' birthday I created A midnight summer's dream inspiration board for a party I was planning for myself.  Being that my birthday falls in mid-summer....it was a perfect theme right?  Well, the theme never came to fruition, but I did have a birthday celebration!  That's not the whole thing though, what's funnier about this particular post is that I added in a featured party from another party stylist.....Lord, work with me!  I really should have done a completely separate post, because her party was amazing!!! #hadnocluewhatiwasdoing :|


So, what do you think?  Good posts?  Horrible Posts?  EH????   I do have some faves that I might share in a later post, but overall, I think this just shows how far I've come and it kinda makes me proud!


Thursday, February 7, 2013

{DIY Party Decor} Chalkboard Serving Tray

I know chalkboard decor is trendy right now.   I am not sure how long it will last, but for right now, it's kinda in.  So, I decided that I'd incorporate it into some of my parties this year.  If you didn't notice, I had a cute 'silver' chalkboard serving tray that was used for the sweets table for my Black & White Gingham Valentine's Day Party Kit.


Today, I'm sharing a little step by step with ya on how you can make your own.

What you'll need:

  • Cheapy serving tray a la Dollar Tree
  • Chalkboard Paint (I used Martha Stewart brand in black...but apparently, they come in lotsa colors)
  • Paint brush
  • chalk
  • baby wipes or dampened paper towel


I read the directions on the back of the bottle, and there wasn't much to do to prep the surface of the tray, other than making sure it was clean (used a baby wipe for that).  If  you notice, however, my tray has some discoloration on it.  I don't know how, why or when that happened, but it's there; since I was painting over it anyway, this didn't really pose a problem.


So, I poured a bit of paint onto the tray and started painting away.


As I went along, I also used a baby wipe to clean up the edges to make a smooth line along the curves of the tray.


The instructions say to put an initial coat of paint onto your surface, wait one hour and then paint a finishing coat to dry for 24 hours.  I couldn't really wait a whole hour and took matters into my own hands and dried it with my trusty space heater turned to the fan setting.


When it was dry, I conditioned the chalkboard by rubbing chalk over it and then wiping it with a baby wipe. I wan't going for a really fancy sign, I wanted it to be very simple.  So, a simple sentiment and some doodling was all I needed.  In the future, I may try something more complex....if my brain is completely awake ;)


 I did manage to knick the paint a bit once it was dried.  Not sure why the paint came up so easily as I did allow it to dry overnight.  I don't know if it's the paint itself or the surface or how I was writing on the chalkboard.  It didn't bother me that much since I was not going for perfection.  However, if I was, I would probably try a primer to the tray first before adding the chalkboard paint.


For more on chalkboard art....check out the links below:

If you need chalkboard art inspiration here's some pretty dope ideas on Pinterest.

Burlap & Denim has a very detailed tutorial on making a chalkboard sign.

Did you know that you could make your own chalkboard paint???

Check this gal out -she's like a chalkboard artisan!


I would love to hear your thoughts on this trend and if you plan on making this simple project on your own, make sure you send a photo and leave a comment!!!


Related Posts

Related Posts with Thumbnails