

It's been a while since I've shared some handmade party fun with you lovely readers. Lately, I've been busy with Etsy shop orders, family obligations, trying to stay healthy and obsessing over the new creative planning trend (I'm so obsessed). We won't get into all of that today, this post is all about my favorite little boy, my son, Adam and how we celebrated his 9th birthday with an epic Nerf Battle Party!
Here's a look at all the fun we had....to read about how we pulled it all together scroll down for all the details
Here's a look at all the fun we had....to read about how we pulled it all together scroll down for all the details
PARTY ELEMENTS THAT INSPIRE:
- Battle Gear Station
- Mini DIY Obstacle Course
- Simple Party Cake Topper
- Treats station with all the battle fixins


Theme
If you've been a reader for a while, you know that I've planned some pretty fun celebrations for my kiddos. We've hosted a Monster High spa party, a Sonic the Hedgehog party, and since both kids celebrate their birthdays in the same month, we even once had a dual Rock Star Party. Well, this year, we decided that we'd make this our last year to do big parties for a while.
April is always such a busy month for birthdays in our family and the following weeks just end up being a bit too crazy. So, getting back to normal is always a challenge during that time of the year.....which is why I'm FINALLY able to sit down and share this party recap with you!
April is always such a busy month for birthdays in our family and the following weeks just end up being a bit too crazy. So, getting back to normal is always a challenge during that time of the year.....which is why I'm FINALLY able to sit down and share this party recap with you!
In the past most of my son's parties have been focused on some sort of video game character or a super hero. Well, when he told me the theme he wanted this year, I was a bit shocked. I was mostly shocked because he initially didn't even want a birthday party, opting instead to just have a quiet pizza dinner at home with his family. Well, at some point, (notably after my daughter's birthday party) he changed his mind....and said he wanted a Nerf Battle party.
This whole theme threw me off because the boy barely plays with his Nerf guns. So, I'm blaming You Tube for this new-found obsession as it seems that all roads point back to online videos. My best guess is he came across a Nerf Battle video and the seed was planted. Regardless of the theme's inception, I was all too happy to oblige.
This whole theme threw me off because the boy barely plays with his Nerf guns. So, I'm blaming You Tube for this new-found obsession as it seems that all roads point back to online videos. My best guess is he came across a Nerf Battle video and the seed was planted. Regardless of the theme's inception, I was all too happy to oblige.
Decor
After we set the date, I started planning all the details. I knew automatically I would use lots of bright bold yellows, oranges and blues for the color scheme. It was an absolute must that we had lots of darts, Nerf Guns of course and battle gear. Once my basic ideas were in place, I began shopping for fun items that I could use to pull this shindig together.
I'm all about throwing theme parties, but I like to do it on a budget...and by budget, I mean, try and keep the cost very low. So, I tend to shop my home, my party stash, the Dollar Tree and online deals for most of our parties. I really tried to keep the decor as simple and affordable as I could so, there were plenty of DIY elements to this party.
Half of our yard was set up as an obstacle course using, inexpensive hula hoops, rope, wood planks (already owned and used in our yard as a garden border), repurposed wooden pallets constructed using rope to create a battle bunker and cardboard boxes spray painted camo style for our training area.
To add color to the whole yard, I originally wanted to use crepe streamers, but it was very windy the day of the party and the streamers wouldn't hold up. So, I used plastic table covers instead. I cut cut them into wide strips and tied them just about everywhere that needed a pop of color. It was great because they could be as long or short as I needed them to be. In addition to the colorful plastic streamers, I also added lots of balloons onto things. I also added balloons around the yard for more color.
Normally, I would design my own printables for our parties but this time I did something a little different. As I was looking for party ideas online, I came across the cutest Nerf themed party and it just happened to be for the son of two 'sweet' party friends, Heather and Jason of Hello my Sweet, hosted a Nerf themed party for their son a few years ago. I loved their printables and was so happy to be able to use them for Adam's party. They were so perfect and so different....and they saved me a good day and a half of designing, printing, cutting and assembling.
To add color to the whole yard, I originally wanted to use crepe streamers, but it was very windy the day of the party and the streamers wouldn't hold up. So, I used plastic table covers instead. I cut cut them into wide strips and tied them just about everywhere that needed a pop of color. It was great because they could be as long or short as I needed them to be. In addition to the colorful plastic streamers, I also added lots of balloons onto things. I also added balloons around the yard for more color.
Normally, I would design my own printables for our parties but this time I did something a little different. As I was looking for party ideas online, I came across the cutest Nerf themed party and it just happened to be for the son of two 'sweet' party friends, Heather and Jason of Hello my Sweet, hosted a Nerf themed party for their son a few years ago. I loved their printables and was so happy to be able to use them for Adam's party. They were so perfect and so different....and they saved me a good day and a half of designing, printing, cutting and assembling.
Battle Gear Station
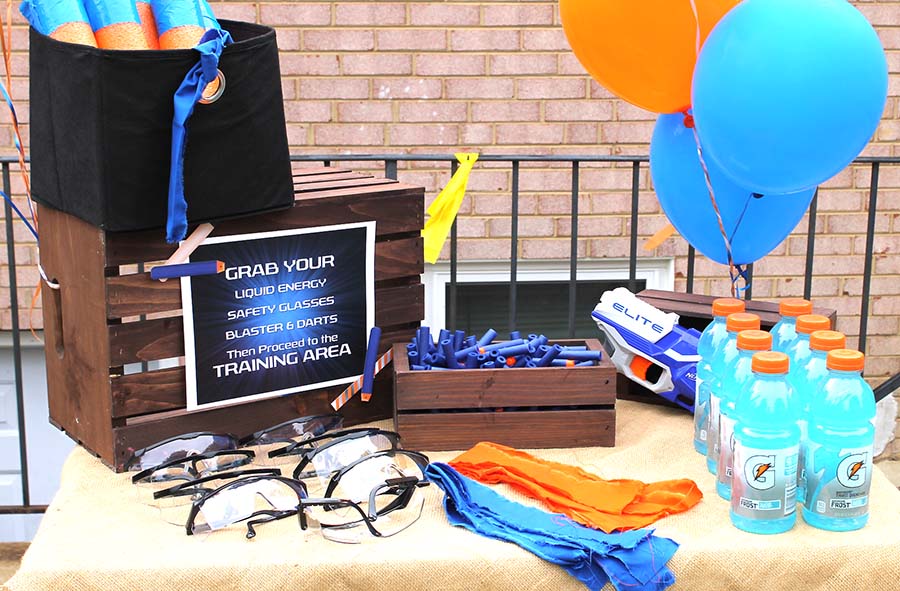
We created a Battle Gear Station for the kids to choose all their 'safety' gear. The table set up was sort of the 'centerpiece' of our training course area. I just used wooden crates that we already owned and filled them with Nerf darts, burlap and balloons to dress it up....then added the gear to the table....the printable sign pulled everything together and helped me determine what would be placed on the table.
My son and daughter were team captains and chose their team members. My son's team was the blue team and my daughter's orange. Each child was outfitted with team bands, safety goggles, dart belts and darts, along with their choice of Nerf Guns.
For the dart belts, I found a great idea on Pinterest using duct tape and stuck the darts around the kids' waists. Honestly, this hack was about a 50/50 fail....for some of the kids, the duct tape belts worked great, for some, not so much. You may want to try velcro, elastics or a real Nerf dart tactical vest. The Battle Gear station was also set up with Battle Juice (Blue Gatorade) to keep our little soldiers hydrated.
Adam has a good amount of Nerf guns, but was worried about certain ones getting damaged during the party. So, I purchased extra Nerf guns from the Goodwill. They were all in very good shape and only ran me about $3-$5 a pop.
Activities
Before the main games, the kids had target practice. This activity was very simple, paper cups were set up onto the camouflaged cardboard boxes and they took turns shooting the cups off the boxes. We also printed out the targets that came with the printable set...for every shot that hit a specific number on the target, the kids could get that amount in extra darts.
We started the big battles after target practice with playing capture the flag where each team had to run across the yard to try and steal the other team's flag. The kids also played Bunker Battle. For the Bunker Battle, I nabbed 3 wooden pallets from the loading dock at my job and hubby constructed a makeshift fort. We also added those plastic streamers to it for color. The last game was Every Man for Himself, which was literally every man for himself....last man standing without getting shot with a dart was the winner.
The final activity was the obstacle course where the 'winner' of the obstacle was the one who completed it in the shortest time. For the obstacle course, we used hula hoops, small cones and poly rope. We used two types of hula hoops, the small ones for the first obstacle. The kids had to step through the hoops to get to the next obstacle. The other hoops were the largest we had and those were cut those about 3 quarters of the way off. We used them to created arches with for the Belly Crawl portion of the obstacle.The next obstacle was a rope challenge, set up so the kids had step through the ropes without stepping on them. I just used poly rope and wooden dowels staked into the ground
Food
A festive treats table was also set up with tasty snacks with fun names.....Battle Blasters (Doritos), Gatorade (Battle Juice), Poppers (Popcorn), Targets (peach flavored gummy rings - you can also use orange slices), Gun Powder (Pixie Sticks) and Pretzel Darts (chocolate dipped pretzels).
The birthday cake was from our Safeway grocery store. I just had them make a Diner Cake (3 layer - top/bottom chocolate middle white) frosted it in the colors of the party. I made my own toppers using my Cricut machine.
Favors
As luck would have it, my poor boy caught a little cold the night before the party, but didn't want to cancel the celebration. After a long nap, he woke up just as the party got started, toughed it out for the first few hours of the bash, then sat out for the rest of the time. He had just enough energy to get through everyone singing Happy Birthday and blow out his candles. We sent everyone on their way with favor bags filled with a pack of extra darts, bubbles that were packaged to match the theme and sidewalk chalk. They also were able to keep their battle gear goggles and team flags.
Shop the party
I hope that you were able to find ideas and inspiration for your own epic Nerf Battle party! To shop the items or similar products for this party - use the links below. You can find items for this party throughout this post or via the following links.
Nerf Printables: Hello My Sweet
Favors
As luck would have it, my poor boy caught a little cold the night before the party, but didn't want to cancel the celebration. After a long nap, he woke up just as the party got started, toughed it out for the first few hours of the bash, then sat out for the rest of the time. He had just enough energy to get through everyone singing Happy Birthday and blow out his candles. We sent everyone on their way with favor bags filled with a pack of extra darts, bubbles that were packaged to match the theme and sidewalk chalk. They also were able to keep their battle gear goggles and team flags.
Shop the party
I hope that you were able to find ideas and inspiration for your own epic Nerf Battle party! To shop the items or similar products for this party - use the links below. You can find items for this party throughout this post or via the following links.
Nerf Printables: Hello My Sweet
Battle Darts: http://amzn.to/2qnPU23
Safety goggles:bbhttp://shrsl.com/?i6eh
Tactical Vest: http://amzn.to/2s2nXKp
Hope you had a 'blast', buddy!

Even though he wasn't feeling 100% I know he enjoyed it as best he could.....another one for the books!!!

LET'S GET SOCIAL!
Are you planning your own epic Nerf Battle using some ideas from this post? Have questions on how to plan or setup an obstacle course? I'd love to hear from you!!!
Visit me @cwbdparties on Instagram, Facebook, Twitter and Pinterest
(This post contains affiliate links. I may receive a small commission when you purchase any from any of the linked items. Money generated from such links are used to create and deliver content for this blog.)Are you planning your own epic Nerf Battle using some ideas from this post? Have questions on how to plan or setup an obstacle course? I'd love to hear from you!!!
Visit me @cwbdparties on Instagram, Facebook, Twitter and Pinterest


