
This is a sponsored post with Royal Designs Studio. I received product for review; all opinions, thoughts and ideas are my own.

Sometimes I come up with a brilliant idea that just blows my mind. I mean normally, my mind is usually so consumed with schedules, errands, writing, designing, mommying.....I can't always make the creativity just happen....and let me tell you friends, that is not fun time for a right-brained gal such as myself. So, when I got an opportunity to review stencils by Royal Design Studio to create my own decorative item, I was all in. Please know that, I'm not usually a painting crafter, I enjoy working mainly with paper and ink...but since I was clearly aware of my recent lack of creative spark, I knew this was a challenge I needed to take on and I am so glad I did because I feel like a genius! A muther-effing crafting genius!
I cannot say for sure, if this amazing idea is actually a 'thing'. When I decided to use the stencil to make a hurricane vase for this review, I had NO CLUE how to make it happen. I mean, I searched the Pinterest boards and saw that the coloring etched glass idea wasn't exactly novel, but I'm kinda thinking my technique for doing it is.....and if it's not - WHATEVER - cause it's still kick ass.
Now, if you're a craft nerd like me, you might want to try your hand at using this technique for your next glass painting project. Here's the skinny and the low-dee-low-down on how I made my fancy hurricane vase.....I used etching cream to create a frosted look to a glass vase and then using an acrylic paint dabber, added color to the etched design on the vase (in my head I see jaws dropping to the floor and many standing in ovation with a slow clap). I truly believe this has put me on genius level - and if this has been done already - don't ruin it for me. Just play along.
That being said, it would be horrible of me to not share how I created my stenciled project step-by-step. So, here ya go!
To make a color-etched hurricane you will need: Glass Hurricane or Vase, Royal Design Stencil the one shown here is Tribal Batik Allover Craft Stencil, Etching Creme, Acrylic Paint Dabber - I used Ocean Blue but choose your own happy color (I should mention that these sweet babies are showing as discontinued on the Ranger site so, grab as many colors as you can while you can), painter's tape - or washi tape, paint brush, paper towel, white vinegar, decorator sand, candle and you are going to need latex gloves to protect your hands, as you'll be working with the etching cream and it can burn you....and no one likes a chemical burn. You may also want to have those foam makeup wedges on hand. I saw somewhere that they clean up the etching cream pretty well and can also be used for application.

1. Determine where you want to place your stencil and tape it to your surface. ( Clearly, I used washi tape - but you can use painter's tape. Also, the instructions that came with the stencil recommended spray adhesive. I don't recommend it for working on glass because it can leave a residue that could affect the outcome of your design).

TIP: Make sure when you're working with glass that the surface is clean and smudge free. Use glass cleaner or vinegar to prep the glass for whatever medium you're using to decorate it.
2. Apply etching cream liberally over the stencil. Etching cream is pretty thick and you want to be sure you get good coverage so, be generous with it. You can use a foam makeup sponge to clean up the cream and place it back into the container, as it can be reused. Make sure you're wearing protecting gloves, as well.

3. Once the cream has been applied, let it sit for 10-15 minutes. You can remove the cream with a foam wedge makeup sponge and put it back into it's container or simply rinse it off. Make sure all of the cream is removed from the glass. Once dried, you should have a beautiful frosted design!

4. If you're going to continue working with the stencil, make sure it's clean and free from the etching cream. Find where you need to place your stencil on the project to repeat the pattern and follow steps 1-3.
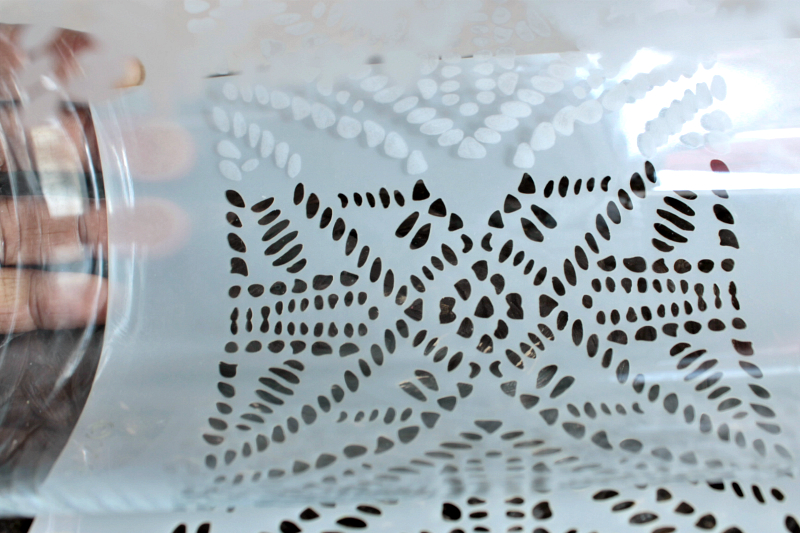
5. Once the glass has been etched and is dry, you can start applying the paint. Dab the paint onto the glass, working in small areas and allowing 1-2 minutes for the paint to 'take' to the etched areas.

6. Using a paper towel dampened in a bit of white vinegar, start wiping off the paint. You'll see that the etched areas hold onto the paint while the rest easily wipes off.

7. You can add more paint to the glass for a more opaque look or rinse it with water for a tinted look.


8. Add sand or other filler, like glass rocks, pebblestones or dried beans to anchor your candle.

9. Light your candle and show off your fancy new Hurricane Vase!


My review:
I loved creating this project and just want to share some thoughts on the actual product and selection process for choosing a Royal Design Studio Stencil.
1. There are so many options available on the Royal Design Studio site and choosing is less complicated because there are a lot of great photos with ideas to choose from, allowing you to get an idea of how using the stencil you select will work in your space or for your project.
2. Make sure you read the instructions that come with your stencil. There are a lot of tips (that I didn't really read) that will help you create a beautiful stencil design. The instruction sheet is very clear cut and had I read it, I would have taken better care to make sure that cream didn't seep under the stencil edges.
3. The actual stencil is VERY durable and pliable. The latter feature was perfect for me because I needed it to easily wrap around a cylinder. Also, I was concerned about how the material would react to the etching cream and as you can see, it definitely holds up.
4. All in all, I was really happy with the product and appreciate the information that was provided along with the stencil to ensure that I was informed on how to use create a perfect stencil.
If you're planning on stenciling I definitely recommend using Royal Design Studio Stencils - and if you do choose to make them, I'd love to see what you create!
Visit me on Instagram, Pinterest, Twitter and Facebook to see more projects, ideas and just my life in general!


