SEARCH THIS BLOG

Thursday, December 23, 2010

{FREE PRINTABLE} Snowflakes & Stockings Christmas Colletion 2010

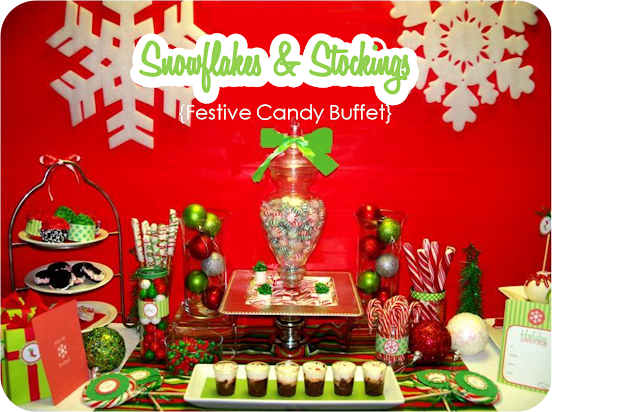
I created this printable collection for a Christmas sweets table I made for my kids this year.  After seeing a set of stockings in the Pottery Barn Kids catalogue,  I was inspired by the color and came up with the theme. 


I was going to add this collection my Etsy store, but decided to post it on here for free for you!  The collection includes a banner, gift tags, circle tags, napkin rings, buffet cards and more!  With a little creativity many of the printables can be used interchangeably.

Thank you for taking the time out of your days to read my ramblings on about parties, entertaining, cupcakes and whatever else is going on in my wacky brain!  I've gotten to know some of you through email and have made some blog friends.  This year has been great and I expect 2011 to be even better!

You can download this collection for free here.


Wednesday, December 22, 2010

An Answered Prayer

MEET 'LUCKY'


She's not my dog.  About two Saturdays ago I saw this little princess running up the busy main road by my house. Clearly she was lost or had gotten away from her home.  She had on a red sweater but no ID and I knew that someone was missing her bad.  I brought her into our home and promised my husband that I wasn't keeping her and consistently reminded my two kids of the same thing.  Since we didn't know her name we called her 'Lucky' because it was by luck that I just happened to be looking out the window at the time I saw her trotting down the road. 

First thing Monday, I called the Vet's office and animal shelter in my area and left my contact info hoping that someone would claim her.  I even kept an eye out for postings about a missing dog and saw nothing.  We started to treat 'Lucky' as a member of our family and even got her a doggy bed to sleep in.  My daughter fell in love with her and was on a campaign to make her stay permanent.  I kept reminding her that 'Lucky' belonged to someone else and I wasn't sure we'd keep her.  My husband told me that if noone claimed her that the decision would be mine to make as what to do with her.

Well, after almost two weeks of not hearring anything I realized that although I really would love to have a dog eventually and that 'Lucky' is a sweet and well behaved dog, that I didn't have the time to focus on keeping up with her.  She has some age on her and my kids are very rambunctious and hyper and it just wasn't going to be a good fit for our family.   I'd made it up in my mind that after the New Year I would bring her to the shelter.  I had a rough night sleeping last night because I looked into 'Lucky's' little eyes and knew that she knew what I was planning.  She stayed in her little pet bed all night where normally she'd follow me around wherever I went.  I told her that I know that someone was missing her and that she was missing her owner and that God will make sure that she gets back home.

As I got into work this morning I had a message that someone called about a lost dog!  I immediately called the number and spoke to 'Lucky's' owner and she was so relieved and overjoyed.  I found out that 'Lucky's' name is Winnie and that she'd gotten out of the house during a holiday party the owner was having and that's why she was dressed in the red sweater. Winnie's owner lives a few streets away from us and posted signs about her dog but never got down to my street because she didn't think that Winnie would run that far.  She told me that Winnie is her best friend & her baby and how she prayed to God that she would be returned home for Christmas.

I will tell you that God answers prayers!  I am so happy that Winnie can be back home where she belongs and that her owner will have a very special and Merry Christmas!

{Day 12} 12 Days of Cupcakes - Xmas Tree Cupcake Cake Tutorial

It's the last day of the 12 Days of Cupcakes series!  I hope you enjoyed all the delicious recipes and were able to get some useful tips.

You ever see those cupcake cakes in the grocery store?  Well they are super easy to make.  Here is one that I created for my office co-workers to say Merry Christmas!


To make your own, bake your cupcakes using your favorite cupcake recipe; I used 13 cupcakes for the cake I made.  Form your cupcakes into a triangular shape with about 2-3 cupcakes centererd at the bottom of the cupcake to create a base. 


 Add a small bit of frosting to the bottom of each cupcake to create a 'glue' to prevent cupcakes from moving around while frosting.


Frost your cupcakes with green frosting same as you would a regular cake, being sure to spread frosting in an even layer.  Frost the base white, red or brown.


 Add pretzel rods to the bottom of the triangle to mimic a trunk and decorate with candy garland.  Pipe on a star and 'snow' for a wintery look.


GET CREATIVE!
Old Fashioned hard candy placed at the base of the tree creates the look of Christmas gifts!


I also made these sprinkly cupcakes  - just for fun!

I hope you have enjoyed the 12 Days of Cupcakes!  If you have made any of  cupcakes from the recipes posted - please feel free to send photos to me at kikikens8375@gmail.com and I will add them to a photo gallery on the 12 Days of Cupakes Page.

Tuesday, December 21, 2010

{Day 11} 12 Days of Cupcakes - Eggnog Cupcakes

These Eggnog cupcakes are a perfect holiday treat.  I have been wanting to make an Eggnog cupcake ever since I made my Eggnog cheesecake last Christmas.  I attempted to make my own recipe using an altered version of my vanilla cake recipe but it was missing something.  So, I searched online and I came across this recipe on annie-eats and I must say it makes one darn good Eggnog cupcake!  I altered the frosting a bit, but for the most part - it rocks!


Eggnog Cupcakes

Ingredients:
1 1/3 cups all-purpose flour
¼ tsp. baking soda
½ tsp. baking powder
½ tsp. salt
¼ tsp. freshly ground nutmeg
¼ cup dark rum or bourbon (optional)
1 cup eggnog
¼ cup vegetable or canola oil
1 tbsp. apple cider vinegar
1 tsp. vanilla extract
1 cup sugar

(Frosting Recipe Follows) 

Directions:
1. Preheat the oven to 350˚ F and line a muffin pan with paper cupcake liners.

2. Whisk together flour, baking soda, baking powder, salt and nutmeg.

3. On medium-low speed, in a separate bowl, blend together rum, eggnog, oil, vinegar, vanilla and sugar.

4. Add the dry ingredients to wet ingredients in three batches on low speed until well combined.

5. Fill cupcake liners 2/3 full and bake for 22-24 minutes or until a toothpick inserted in the center comes out clean.  Allow to cool in the pan 5 minutes, then transfer to a wire rack to cool completely.


Eggnog Frosting

Ingredients:
20 tbsp. unsalted butter, at room temperature
1 tbsp Vanilla
2½ cups confectioner's sugar, sifted
Pinch of freshly grated nutmeg
2½ tbsp. eggnog
1 tbsp. dark rum

1. Beat butter on medium-high speed until smooth.  Add vanilla and mix on medium speed for 30 seconds.

2. Gradually add confectioner's sugar and nutmeg mixing on low speed until combined, being sure to scrape sides of bowl as necessary.  Once sugar is incorporated into butter mixture, mix on medium high speed until well combined.

3. Add eggnog and rum mixing on medium speed until light and fluffy.

4.  Frost cupcakes as desired; sprinkle cinnamon or nutmeg as garnish.


Sunday, December 19, 2010

{Day 10} 12 Days of Cupcakes - Peppermint Chocolate Cupcakes


Peppermint and chocolate go together like Jenny and Forrest. 

This cupcake reminds me of those Girl Scout Thin Mints Cookies.  The chocolate cake is rich and very moist and the peppermint flavor is a perfect accompaniment.

You can dress these cupcakes up with peppermint bark, peppermint starburst candies, candy canes or an chocoate peppermint wafer.  I frosted mine with a Peppermint buttercream that I tinted Christmas green and added a peppermint candy and chocolate mint for a topper.  You can also try a white chocolate peppermint flavored frosting and before you pipe on your frosting paint 2 streaks of red food gel on the inside of your bag to create a swirl effect!

Peppermint Chocolate Cupcakes

2 cups Sugar
1 3/4 cups All-Purpose Flour
3/4 cup Cocoa Powder
1 1/2 tsp Baking Powder
1 1/2 teaspoons baking soda
3/4 tsp Salt
2 Eggs
1 cup Milk
1/4 cup Vegetable Oil
1/4 cup Butter, melted
2 tsp Vanilla Extract
1 cup Boiling Water
1 tsp Peppermint Extract

Mint Buttercream Frosting Recipe follows

To Make
1. Heat oven to 350 degrees and line a muffin pan with paper cupcake liners.

2. In a large mixing bowl, combine sugar, flour, cocoa, baking powder, baking soda, and salt together.

3. In a large measuring cup whisk together eggs, milk, oil, butter, and vanilla & peppermint extracts.

4. Add wet ingredients to the dry ingredients and mix on medium speed for about 2-3 minutes, being careful not to overbeat.

5. Gradually stir in boiling water to mixture (mixture will become thin).

6. Fill cupcake liners with batter and bake for 18 to 20 minutes or until a toothpick inserted in the centers of the cakes come out clean.

7.  Cool cupcakes in pan for 5 minutes then transfer to wire rack to cool completely prior to frosting.


Peppermint Buttercream Frosting(This is a basic vanilla buttercream frosting with Peppermint extract added - you can omit the vanilla if you want a straight peppermint frosting).

Ingredients:
1/2 Cup Butter, softened
1 Tsp Vanilla Extract
1 Tsp Peppermint Extract
4 cups Confectioner's Sugar
1 Tbsp Milk

Directions:
  1. Beat butter until creamy.
  2. Add vanilla and peppermint until combined.
  3. Gradually mix in confectioner's sugar.
  4. Add milk.


Friday, December 17, 2010

{Day 9} 12 Days of Cupcakes - Red Velvet Cupcakes

Ya can't have Chrismtmas without a little bit of Red Velvet cake - or cupcakes!  It's like the Grand Dame of Christmas cakes!

You may have noticed how popular this flavor of cake has become and it does not seem to be dying out.  I have tried various versions of it over the years.  Some have a cake that is bright red, some a deep dark rich burgundy - have you ever seen the pink and green versions???  BUH-NAN-AHS....and let's not get started on the frosting.  I love to make mine with Marshmallow Coconut Cream Cheese Frosting.  Yet, nothing tops my Grandma Mary's version or Red Velvet Cake and as much as I'd like to share that recipe with you - she ain't coming up off of it.  Worry not, I do have another version to share that I deem - acceptable. 

This little ditty was in a copy of Good Housekeeping and it's pretty darn good.  It's a version by McCormick and what I found interesting was the use of sour cream instead of buttermilk and/or vinegar.  I think it gives the cake a comparable richness to other Red Velvet cakes but with a bit more depth of flavor.  Top this cupcake with Marshmallow Cream Cheese frosting and a candied pecan and you're in Red Velvet Heaven!


Red Velvet Cupcakes
via McCormick

INGREDIENTS
2 1/2 cups flour
1/2 cup unsweetened cocoa powder
1 teaspoon baking soda
1/2 teaspoon salt
1 cup (2 sticks) butter, softened
2 cups sugar
4 eggs
1 cup sour cream
1/2 cup milk
1 bottle (1 ounce) McCormick® Red Food Color
2 teaspoons McCormick® Pure Vanilla Extract

Marshmallow Cream Cheese Frosting (recipe follows)
DIRECTIONS
1. Preheat oven to 350°F. Mix flour, cocoa powder, baking soda and salt in medium bowl. Set aside.

2. Beat butter and sugar in large bowl with electric mixer on medium speed 5 minutes or until light and fluffy. Beat in eggs, one at a time. Mix in sour cream, milk, food color and vanilla. Gradually beat in flour mixture on low speed until just blended. Do not overbeat. Spoon batter into 30 paper-lined muffin cups, filling each cup 2/3 full.

3. Bake 20 minutes or until toothpick inserted into cupcake comes out clean. Cool in pans on wire rack 5 minutes. Remove from pans; cool completely. Frost with Vanilla Cream Cheese Frosting.

Marshmallow Cream Cheese Frosting

1 (8-ounce) package cream cheese, softened (I like Philadelphia)
1/2 cup butter, softened
1 tsp. Vanilla Extract
1 jar (7oz) marshmallow fluff
4-5 cups confectioner's  sugar

1. Cream butter and cream cheese together until blended
2. Add vanilla and marshmallow fluff.
3. Gradually add in confectioner's sugar about 1/4 cup at a time. 


Mmmmmm......


I'm making a bundt cake tomorrow with this recipe - I'll add an addendum pic to this post to show you how it turns out!!!!

(Post Update 12/19/2010 - as things go when you're rushing out the door to a holiday party with two little ones in tow- things happen.  Ya'll, I forgot to take a picture of my bundt cake!  It was soooo pretty.....but even better it was sooooo delicious.  Don't worry - I'll be making one again for Christmas and will update the post again.)

Thursday, December 16, 2010

{Day 8} 12 Days of Cupcakes - Guiness Chocolate Cupcakes with Baileys Buttercream Frosting

These Guiness Chocolate Cupcakes with Bailey's Buttercream were a hit with my 'test panel' when I made them earlier in the year.  I hailed them as the THEE best cupcakes evah.  So, for today's cupcake I wanted to revisit my favorite cupcake and share my updated recipe with you. 


Guiness Chocolate Cupcakes
with Bailey's Buttercream
Makes 20 to 24 cupcakes
Ingredients:
For the Guinness Chocolate Cupcakes
1 cup Guiness Stout
2 Sticks (1 Cup) unsalted butter
3/4 cup unsweetened cocoa powder (I like Hershey's)
2 cups all purpose flour, sifted
2 cups sugar
1 1/2 teaspoons baking soda
1/2 teaspoon salt
2 large eggs
2/3 cup sour cream

Ganache Filling 
9 oz. bittersweet chocolate, chopped
1 cup heavy cream
2 tablespoons butter, room temperature
1 Tbsp. Jameson Irish whiskey (optional)

Baileys Frosting (see Recipe Notes)
3 to 4 cups Confectioner's Sugar
1 stick unsalted butter - room temperature
3 to 4 tablespoons Baileys Irish Cream

To make the cupcakes:
1. Preheat oven to 350°F. Line 24 muffin tins with paper liners.

2. Melt butter with the beer in a heavy sauce pan over medium heat and bring to a simmer. Whisk in cocoa powder until smooth; allow sauce to cool slightly.

3. Whisk  flour, sugar, baking soda and salt in a large bowl and set aside.

4.  In a mixer bowl, blend eggs and sour cream on medium speed; beat in the cooled cocoa sauce until combined.

5. Beat in flour mixture until slightly combined.  Then fold the batter to completely combine the ingredients.

6 . Fill the cupcake liners about 2/3 full and bake for 17 -20 minutes or until a toothpick inserted into the middle of a cupcake comes out clean. Cool completely on a wire rack.
To  make ganache filling:
1. Place chopped chocolate a large glass bowl.

2. Heat heavy cream on medium high until it comes to a simmer. 

3. Remove from heat and immediately pour over chocolate pieces and stir until completely mixed and glossy in apperance; stir in butter and whiskey until combined. 

4. Set aside to allow ganache to set (thicken)  and cool completely.  (Ganache should be soft enough to pipe into the cupcake)

Fill the cupcakes:
1.Hollow out the center of the cupcake using a mini ice cream scooper, melon baller or apple corer - a sharp paring knife works fine as well.  Discard (aka eat) the leftover cake bits.

2. Fill a piping bag with the ganache and snip off about 1/2" from the tip and fill each hole in the cupcakes to the top. You can spoon the filling into the cakes, as well.

To make the frosting:
1. Whip butter on medium speed until light and fluffy. 

2. Gradually add confectioner's sugar - (adding about a tablespoon at a time lends to a very nice texture)

3. Once butter becomes thick and stiffend, slowly add in the Bailey's.

4. Continue whipping frosting until combined.  Frost cupcakes as desired.  


Wednesday, December 15, 2010

Snowflakes & Stockings { Red & Green Festive Sweets Buffet}

ATTENTION!!!!  ATTENTION!!!!

We are stopping your regularly scheduled
blog post for an important announcement!

If you are looking for a lil' sumthin' to jazz up your holiday party here is a colorful holiday sweets buffet I created for my kids with tips on decorating it to inspire you.


Top Marshmallows buttercream frosting!


Fill empty jars, bowls and vases with candies, gumballs and ornaments.


Offer guests a variety of desserts by displaying sweet treats on a tiered stand.


Serve no bake desserts like Chocolate Peppermint Mousse in shot glasses with demi spoons.


Fun Chocolate Covered Apples are a fun treat and easy to make.


Use easy templates to make favor bags for guest to take home.  I created a pleated bow by folding paper fan stlye and gluing to the top of the box.  Fill them with candy, gift cards or other treats!


Use your imagination and be creative!


Free printables from this party are available here.

Tuesday, December 14, 2010

{Day Seven} 12 Days of Cupcakes - French Vanilla Mousse Cupcakes

 Vanilla cupcakes are the cupcakes I tend to make the most.  I'm not sure what makes people always want them - I guess you can't go wrong with vanilla.  When I make Vanilla layer cakes I like to fill them with a French Vanilla Mousse Filling.  I wanted to try out filling my vanilla cupcakes with the mousse to see how they would come out, and as it stands, I really liked them.

This mousse is a simple pantry shortcut recipe.  Using instant pudding, instant flavored coffee and whipped cream, you can have a very delicious and easy to make mousse.


French Vanilla Mousse Cupcakes

Vanilla Mousse
Ingredients: 
1 pkg. Vanilla Flavor Instant Pudding
1/4 cup International Delight French Vanilla Cafe
2 Cups Cold Milk
1 Cup Cool Whip or Whipped Cream

To Make:
Mix instant pudding mix with French Vanilla Cafe until combined.  Gradually add milk to the pudding mix while stirring, about two minutes.  Mixture will thicken upon standing.  Fold in whipped topping until well combined.  Refrigerate for one hour.

_______________________________________________________________________________

Vanilla Cupcakes:
Ingredients
1 3/4 cups cake flour
1 1/4 cups all-purpose flour
2 cups sugar
1 tablespoon baking powder
3/4 teaspoon salt
1 cup (2 sticks) unsalted butter, cut into 1-inch cubes
4 large eggs
1 cup whole milk
1 teaspoon pure vanilla extract

Instructions:
1. Preheat oven to 325 degrees and line muffin tins with paper liners.

2. In a mixing bowl combine flour, sugar, baking powder, and salt; mix on low speed until combined.

3. Add cubed butter, mixing until coated with flour.

4. In a separate bowl, whisk together eggs, milk, and vanilla. Add the wet ingredients in 3 parts to the dry ingredients - scrape dowl sides of bowl before adding more of the mixture.

5. Pour batter into the liners about 2/3 full. Bake for 10 minutes then rotate the pan; bake for another 8-10 minutes or until a cake tester inserted in the center comes out clean.

6. Transfer cupcakes to a wire rack to cool.

7. Once cooled, using a small ice cream scooper or melon baller to remove cake center to create a hole to fill in with the Mousse. Reserve cake pieces.  Using about 2 cups of the mousse add filling to cupcake centers.  Add cake pieces back to top of cupcake to top off.

8. Frost or pipe each cupcake with remainingVanilla Mousse.  Refrigerate if not consuming immediately.


Monday, December 13, 2010

{Day Six} 12 Days of Cupcakes - Coconut Snowball Cupcakes

We are half way through our 12 Days of Cupcakes series!!!  I'm having fun with this and hope that you are too!

I love watching cooking shows and one of my favorites is America's Test Kitchen.  I appreciate how they test and review different recipes or ingredients in a very easy to understand manner.  For Thanksgiving, I made a Coconut Layer Cake using a recipe I got from this episode and it made the best Coconut Cake I've ever had. 

When I decided to this series I knew I wanted to use that same recipe for a cupcake but with a twist.  You know those delicious Hostess cakes called Snowballs?  Well I wanted to make a cupcake similar to that.  Using the Coconut Layer Cake recipe, I baked the cupcakes, and when they were cooled I hollowed out the inside a bit and filled it with good ol' marshmallow fluff !


The recipe calls for toasted coconut flakes but for my cupcake I coated the frosting with plain sweetened coconut.


Before you get started - remember this recipe is for a layer cake.  To make the Snowball cupcakes, do everything listed in the steps, omit the toasted coconut, fill each cupcake by filling them with Marshmallow Fluff, frost and top with sweetened shredded coconut.  Don't forget to keep the cake pieces that you hollow out.  They have to go back over the top of the cupcake once it's filled.  The recipe should yeild just about 24 cupcakes.  I also left all the steps to making the cake, because the cake itself is AWESOME!

Coconut Layer Cake
via America's Test Kitchen


Makes one 9-inch, 4-layer cake
Cream of coconut is often found in the soda and drink-mix aisle in the grocery store. One 15-ounce can is enough for both the cake and the buttercream; make sure to stir it well before using because it separates upon standing.
Ingredients
Cake
  • 1 large egg
  • 5 large egg whites
  • 3/4 cup cream of coconut
  • 1/4 cup water
  • 1 teaspoon vanilla extract
  • 1 teaspoon coconut extract
  • 2 1/4 cups cake flour (9 ounces), sifted
  • 1 cup granulated sugar
  • 1 tablespoon baking powder
  • 3/4 teaspoon table salt
  • 12 tablespoons unsalted butter (1 1/2 sticks), cut into 12 pieces, softened, but still cool
  • 2 cups packed sweetened shredded coconut (about 8 ounces)
Buttercream
  • 4 large egg whites
  • 1 cup granulated sugar
  •   pinch table salt
  • 1 pound unsalted butter (4 sticks), each stick cut into 6 pieces, softened, but still cool
  • 1/4 cup cream of coconut
  • 1 teaspoon coconut extract
  • 1 teaspoon vanilla extract
Instructions
  • 1. For the Cake: Adjust oven rack to lower-middle position and heat oven to 325 degrees. Grease two 9-inch round cake pans with shortening and dust with flour.
  • 2. Beat egg whites and whole egg in large measuring cup with fork to combine. Add cream of coconut, water, vanilla, and coconut extract and beat with fork until thoroughly combined.
  • 3. Combine flour, sugar, baking powder, and salt in bowl of standing mixer fitted with paddle attachment. Mix on lowest speed to combine, about 30 seconds. With mixer still running on lowest speed, add butter 1 piece at a time, then beat until mixture resembles coarse meal, with butter bits no larger than small peas, 2 to 2 1/2 minutes.
  • 4. With mixer still running, add 1 cup liquid. Increase speed to medium-high and beat until light and fluffy, about 45 seconds. With mixer still running, add remaining 1 cup liquid in steady stream (this should take about 15 seconds). Stop mixer and scrape down bowl with rubber spatula, then beat at medium-high speed to combine, about 15 seconds. (Batter will be thick.)
  • 5. Divide batter between cake pans and level with offset or rubber spatula. Bake until deep golden brown, cakes pull away from sides of pans, and toothpick inserted into center of cakes comes out clean, about 30 minutes (rotate cakes after about 20 minutes). Do not turn off oven.
  • 6. Cool in pans on wire racks about 10 minutes, then loosen cakes from sides of pans with paring knife, invert cakes onto racks and then re-invert; cool to room temperature.
  • 7. While cakes are cooling, spread shredded coconut on rimmed baking sheet; toast in oven until shreds are a mix of golden brown and white, about 15 to 20 minutes, stirring 2 or 3 times. Cool to room temperature.
  • 8. For the Buttercream: Combine whites, sugar, and salt in bowl of standing mixer; set bowl over saucepan containing 1 1/2-inches of barely simmering water. Whisk constantly until mixture is opaque and warm to the touch and registers about 120 degrees on an instant-read thermometer, about 2 minutes.
  • 9. Transfer bowl to mixer and beat whites on high speed with whisk attachment until barely warm (about 80 degrees) and whites are glossy and sticky, about 7 minutes. Reduce speed to medium-high and beat in butter 1 piece at a time. Beat in cream of coconut and coconut and vanilla extracts. Stop mixer and scrape bottom and sides of bowl. Continue to beat at medium-high speed until well-combined, about 1 minute.


Friday, December 10, 2010

{Day Five} 12 Days of Cupcakes - Oreo Lover's Cupcakes

This is a cupcake after my own heart!  Oreo cookies are my 'go to in time of need cookie' - if you get my drift.  I love them, they are chocolately and crunchy and the cream inside in the cookie is the bestest.  I likes to eat my Oreos in two bites - with a nice cool glass of Moscato (don't judge me).

I think this recipe is perfect for the person who loves to bake out of the box.  I'm a self-proclaimed cake box snob, however, I wanted to feature at least one a recipe for those who prefer to have their dessert a la Duncan Hines (btw - when/if I do use cake box mixes I prefer Duncan Hines - just a preference  - Betty C. is just as good).

This recipe came to mind when I saw the Cookies and Cream Cheesecake Cupcakes from Martha Stewart's Cupcakes book.  I always wanted to make an Oreo Cookie Cupcake and this gave me the perfect inspiration to do so.  So, I made them and dear God in Heaven - they are BANGING!


Oreo Lover's Cupcakes

24 Double Stuff Oreo Cookies
2 Cups Double Stuff or Regular Oreo Cookies, Chopped into bits
1 Package White Cake Mix
1 1/4 Cup of Buttermilk
4 Eggs
24 Bite size Oreo Cookies (optional)
Whipped Fluffy White Frosting

 1. Preheat oven to 350 degrees.  Fill muffin pan with paper liner.  Place an Oreo cookie in each liner.

2.  Prepare Cake Mix as directed on the box substituting the water for the buttermilk and adding the extra egg.

3. Stir in 1 Cup of the Oreo bits until well blended.

4. Fill each liner with batter about 2/3 full.  Bake for 18-20 minutes or until a toothpick inserted into the center of the cakes come out clean.  Allow to cool in the pan for 5 minutes then transfer cupcakes to a wire rack to cool completely - about 15 minutes.

5.  Stir remaining cup of chopped Oreo bits into the frosting until well combined.  Frost cupcakes as desired and top with a Bite Size Oreo cookie.


The cookie holds its crunchiness and the filling remains creamy; I'm going to grab one right now - enjoy!


Thursday, December 9, 2010

{Day Four} 12 Days of Cupcakes - Chocolate Cupcakes and Peanut Butter Frosting

These chocolate peanut butter cupcakes tastes like little Reese's peanut butter cups - they are SO GOOD!  I added little crunchy toffee bits to mine but you might want to add a peanut butter cup, mini Nutter Butter or a bite size peanut butter cookie to yours.

I am sharing a simple and easy chocolate cake recipe and an even easier Peanut Butter Frosting with you.  It's so easy you can even mix it by hand - which is something I never do - but that is because most of my recipes call for creaming together butter and sugar.....this recipe can be made all in one bowl and bakes up fluffy and moist!  The Peanut Butter frosting is smooth and creamy and really just melts in your mouth.


Chocolate Cupcakes

To Make:
3/4 cup cocoa powder*
1 1/2 Cups All-Purpose Flour
1 1/2 Cups Sugar
1 1/2 Tsp Baking Soda
3/4 tsp Salt
2 Large Eggs (slightly beaten)
3/4 Cup Water (room temperature)
1/2 Cup Milk
1/4 Cup Sour Cream
1 Tbsp Vanilla
1 Stick Melted Butter (Cooled to room temperature)

To Bake:

1. Preheat oven to 350 degrees and line a muffin pan with paper cupcake liners.

2. Whisk together in a bowl, cocoa, flour, sugar, baking soda, baking powder & salt.

3. Add in eggs, water, milk sour cream, vanilla and butter.

4. Whisk ingredients together until well blended - about 3 minutes, be sure to scrape down sides.

5. Pour batter into liners 2/3 full and bake for 18-20 minutes.  Cupcakes are done when centers spring back or a toothpick inserted in the centers come out clean.

6.  Allow cupcakes to cook in pan for 5 minutes then allow to cool completely on a wire rack.

* I like Hershey's Cocoa powder because it's the easiest stuff to find...however, if you come across a really good powder like Callebaut or Sharffen Berger chocolate try them out.

Peanut Butter Frosting

1/3 Cup Peanut Butter
4 1/2 Cups Confetioner's Sugar
1/4 Cup Milk
1 1/2 Tbsp. Vanilla

1.  Mix Peanut Butter until light and fluffy. 

2.  Add two cups confectioner's sugar - mix on low until well combined; add milk and vanilla until combined.

3.  Gradually add in the remaining confectioner's sugar; add extra milk if necessary to get desired consistency.


Wednesday, December 8, 2010

{Day Three} 12 Days of Cupcakes - Orange Buttermilk Cupcakes with Citrus Cream Cheese Frosting

Back in April I whipped up a batch of  Mimosa cupcakes for my friend's birthday brunch.  The recipe I used was tweaked from another recipe I had for Orange Buttermilk cupcakes. I really like the original recipe, but have made my own small changes to it.

These little gems are on my top five list of favorite confections that I've made this year.  The cupcake is super moist, very citrusy and absolutely all-around divine! 

No cupcake is worth it's weight in flour without a good frosting.  You can try a vanilla bean buttercream or a tangy citrus icing to finish off the cupcake.  However, I like to top mine with a succulent orange segment and sprinkle orange zest into a orange flavored cream cheese frosting.


Once you take a bite inside - you will just DIE! (Figuratively....like in a Rachel Zoe kind of way)....


mmmm, mmmm, mm-mm-mm!!!


Orange Buttermilk Cupcakes with Citrus Cream Cheese Frosting

Ingredients:
2 Cups All-Purpose Flour
1 Tsp. Baking Powder
1/2 Tsp. Baking Soda
3/4 Cup Sugar
1/2 Cup Buttermilk*
1 Cups Fresh Squeezed OJ**
1/3 Cup Canola Oil
2 Large Eggs
1 Tsp. Vanilla Extract
1/2 Tsp. Orange Extract

To make:

1. Heat oven to 350 degrees and line a muffin pan with paper liners.

2. Mix flour, baking powder and baking soda in a bowl, set aside.

3. In a separate bowl mix sugar, buttermilk, OJ, oil, eggs and extracts until well combined.

4. Combine wet ingredients to dry, mix on medium speed in two additions, scraping bowl between additions.

5. Add batter to liners and bake for about 18-20 minutes or until an inserted toothpick comes out clean.

6. Allow cupcakes to cool in pan on a wire rack for 5 minutes, then remove from pan and cool completely on the rack before frosting.

*If you don't have buttermilk, mix 1/2 cup milk and 1/2 tbsp lemon juice let stand for 10 minutes before adding to mixture.

** You can use 1/2 cup frozen concentrated OJ in place of fresh squeezed.  Be sure the frozen concentrate is at room temperature before adding to mixture.


Citrus Cream Cheese Frosting

Ingredients:
1 8 oz. Package Cream Cheese, Softened
1 Tsp. Orange Extract
1/3 Cup Powdered Sugar
2 Tbsp. Frozen Orange Juice Concentrate
2 Tbsp. Orange Zest
18 Orange segments (optional)

To Make:

Mix ingredients together until well blended and frosting has a creamy texture.   Top with orange segments.


FYI - I brought these cupcakes in to the job that pays the bills - along with the other cupcakes I made over the weekend and these, in particular, received high marks from my coworkers.


Related Posts

Related Posts with Thumbnails