SEARCH THIS BLOG

Showing posts with label Halloween Costume Ideas. Show all posts

Monday, October 10, 2016

Momster Halloween Costume Idea - 13 Days of Handmade Halloween 2016: Day 1


It's Day one of the 13 Days of Handmade Halloween!  If you're new to my blog, each year I host a 13-day long craft fest of sorts.  My awesome blogging friends pool their creative resources together and come up with some of the most fun Halloween ideas, projects and crafts.  This year, hold on to your seats because there are some majorly pinnable ideas that you will for sure want to make before October 31st!  So, I hope you've got your glue guns ready because the 13 Days of Handmade Halloween 2016 is here!!!!  WOO-HOO!!!


I am so excited to kick off this year's series!  Today I'm sharing a fun idea for a mom costume....folks....this get up is so easy to do, very affordable and a great for moms!!!  Allow me to introduce you to the Momstume.


It's the easiest costume ever....dress up as a 'mom' and done a quirky monster inspired wig!  Haha!  I love it!

It's no secret to all who know me that I absolutely love Halloween.  Growing up in Connecticut, there was nothing better than dressing up for Halloween, meeting up with the neighborhood kids....pillowcase sacks, buckets and bags in tow, skipping down sidewalks, crunching through leaves....the smell of burning firewood filtering out of the fireplaces of the homes as we ran door to door to shout out 'TRICK OR TREAT!' at the top of our lungs.  We kids walked our neighborhood and the neighboring areas until we couldn't walk anymore.   Our bags spilled over with candy and some of us even had the nerve to bring along extra bags or buckets.  What a fun time!

These days, my kids don't get to celebrate Halloween at school the way I did, growing up.  We don't live in the same kind of neighborhood that I lived in.  Most of our neighbors are older and retired and there aren't that many kids on our street - we're lucky to even get trick or treaters.  So, when my kids were really young, I threw them fabulous Halloween parties, instead.  They were really awesome and the kids and their friends truly enjoyed them.  As they got older, however, they simply wanted to go door to door trick or treating.  Well, my dilemma was that we couldn't do much trick or treating in our neighborhood.  Luckily we live in a metropolitan area that never runs out of fun things for families to do.  So, for the past few years, we've made it a tradition to partake in the ultra fabulous festivities of a huge Halloween bash (and I do mean BASH) in nearby Old Town Alexandria.

Each year we've gone....I've donned a corny festive 'mom' top and witch hat, and each year my daughter, always begs for me to put on a costume.  As much as I adore this holiday, I haven't really gotten into the dressing up festivities of it all for one reason or another, but THIS year I am all in!  I recently did a fun  Silly Monster Trunk or Treat idea and dressed up as a Momster!


This costume cost me $0 to make....and here's why....


I was given the Halloween costumes and decor by Oriental Trading in exchange to share some Halloween party ideas on my site.  So, my big blue beehive wig and huge googly eye didn't cost me.  The rest of my costume was pulled right out of my closet.  My mom gear was a pair of khaki capri's, an orange polo top, pearls, an apron and heels....and I added a floral pin to finish off my look.


If you want to see how I made the wig here are the easy steps - watch my video tutorial!  You can purchase the wig and googly eyes on Oriental Trading.


I hope you'll stick around for the next few weeks as I share more Halloween creativity from my blogging friends for the 13 Days of Handmade Halloween.  Don't forget, share your own images on Instagram and use the hashtag #13DOHH2016 in order to win a fun Halloween prize pack from me!

What are some of your fondest childhood memories from Halloween.  I'd love to hear -  leave a comment below!

LET'S GET SOCIAL!  Find more celebrations and Halloween fun @cwbdparties on InstagramFacebookTwitter and Pinterest


Tuesday, October 20, 2015

How to Make a Day of the Dead Headband


Hey there! Tonya Coleman from Soiree Event Design here and I am happy to be back again this year to share another tutorial as part of the 13 Days of Handmade Halloween with so many other talented party people! This tutorial was inspired by my daughter, Faith who is an avid DIY'er! She makes things ALL THE TIME and one of her signature crafts is her custom headbands. So, I asked her to teach me how to make a Day of Dead Headband that I could wear this year for Halloween with my super cool Day of the Dead mask. Now all of you can find out how too!

If you like her tutorial, you can find her over on her own YouTube channel where she teaches LOTS of really cool DIY projects! Click here to see this entire tutorial on YouTube!

Let's get crafting! First we started with a trip to Michaels to get all of the supplies we needed that included: - Headband (wide band) - Acrylic paint (various colors) - 3 bunches of small white flowers - Plastic spiders - Paintbrush - Hot glue gun


Now that we have all of our supplies, we are ready to get started!


Step 1: Remove the flower heads from the stems 


Step 2: Hot glue the flowers all along the top of the headband


Step 3: Paint each flower a different color Don't paint the entire flower, you want to get a splatter effect by using a wide paintbrush and pushing down on to the center of each flower with the paintbrush. 


Step 4: Add a plastic spider 


That's it! Super easy and cute! Perfect for my Halloween outfit! We also created a Day of the Dead wreath to match this for my front door.


Cheers! Tonya

Styling & photography: Soiree Event Design
Tutorial: PastelGamerGirl13 (my daughter)
Supplies: Michaels

Tonya, your daughter certainly has inherited your creative gene!  Thanks to you, and Faith, for sharing!  Looking for more Handmade Halloween treats, view our archives here!


Wednesday, October 15, 2014

{13 Days of Handmade Halloween} Halloween Hair Ties


Today I'm sharing a simple and easy Halloween hair tie idea. These hair accessories are super trendy right now.  I make them all the time for my daughter and myself using just foldover elastic.  They're perfect for anyone who wants to be a little bit festive but without all the fussiness that comes with donning a whole costume! These are also great for classroom gifts, party favors, a no candy option for trick or treaters or to wear on your wrist as an accessory!

To create the hair ties you will need:

SUPPLIES
(NOTE: You can make these a no sew project by using flat back button embellishments with a dab of fabric or hot glue)


Step 1
: Measure your elastic between 10"-11" and cut.


Step 2: Tie an over hand knot or a simple knot to close up the ends of the elastic.  Be gentle with the ends - they tend to fray.


Step 3: Sew on (or glue) button embellishments to the elastics.  You can use flat back buttons and glue them on for the new sew option.


Step 4: Add hair ties to a thick 3"x5" cut of decorative cardstock and remember to pass them out on Halloween for no candy option, use as party favors or slide them on your wrists for festive arm candy!


Hope you're enjoying the 13 Days of Handmade Halloween series and please share your own Halloween projects, ideas and crafts in the linky party below!


Tuesday, October 7, 2014

{13 Days of Handmade Halloween} No Mess DIY Crown Headband Tutorial from Kristal of Atutudes Hand Made Tutus


Hi! I am Kristal of Atutudes Hand Made Tutus and I am here to share a quick and easy no mess, yes – I said no mess – crown tutorial. I love items I can make quickly, easily, and no mess is a bonus. And I really love GLITTER! But glitter can be really messy. I have seen several crown tutorials, all requiring glitter and glue or spray paint and drying time. In my hectic schedule it sometimes can seem daunting thinking of the drying time and clean-up process afterwards. When I spotted these glitter fabric sheets at Hobby Lobby, a light bulb went off! The beauty of glitter and none of the mess. There is very little shedding from these sheets, so there will be minimal glitter specs in your hair and all over the house.

Approximate Time: 15 minutes


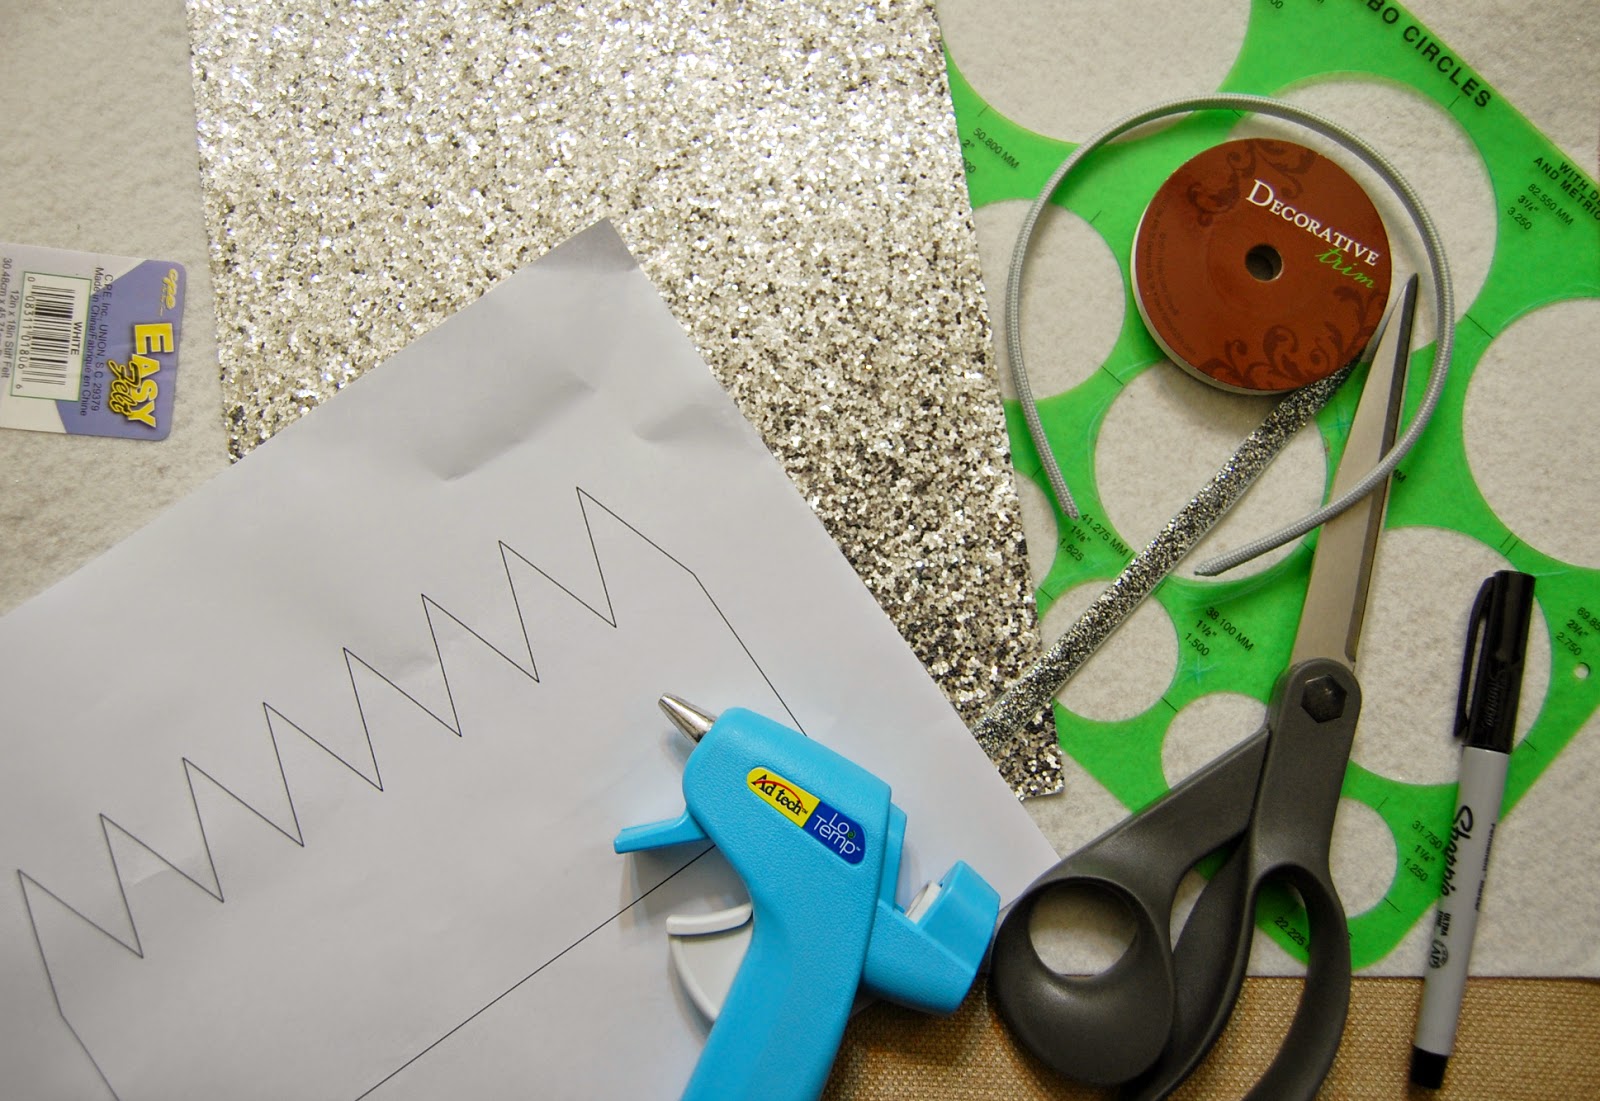
Materials Needed:
- 1 Sheet of Glitter Fabric or Glitter Foam (Glitter Fabric available at Hobby Lobby)
- 1 Fabric Covered Headband
- 1 Sheet of Stiff Felt
- Hot Glue Gun and Hot Glue Sticks
- Blue Dress Maker’s Pencil (or light colored pen)
- Sharp Scissors
- Circle Template (or 2.25” circle guide as pictured)
- Crown Template

http://bit.ly/1rTraGr

https://www.dropbox.com/s/bfdff9bm5y136fh/Circle%20Template.jpg?dl=0


Instructions:

Print out your circle and crown templates and cut them out along the lines.


Trace around your crown template with the dress maker’s pencil onto the back of the glitter fabric sheet. NOTE: I started to use a sharpie and realized it would show if not cut perfectly, so I switched to the blue pencil.


Cut out the crown shape.

Trace two circles onto your stiff felt with the dress maker’s pencil. Cut out the circles.


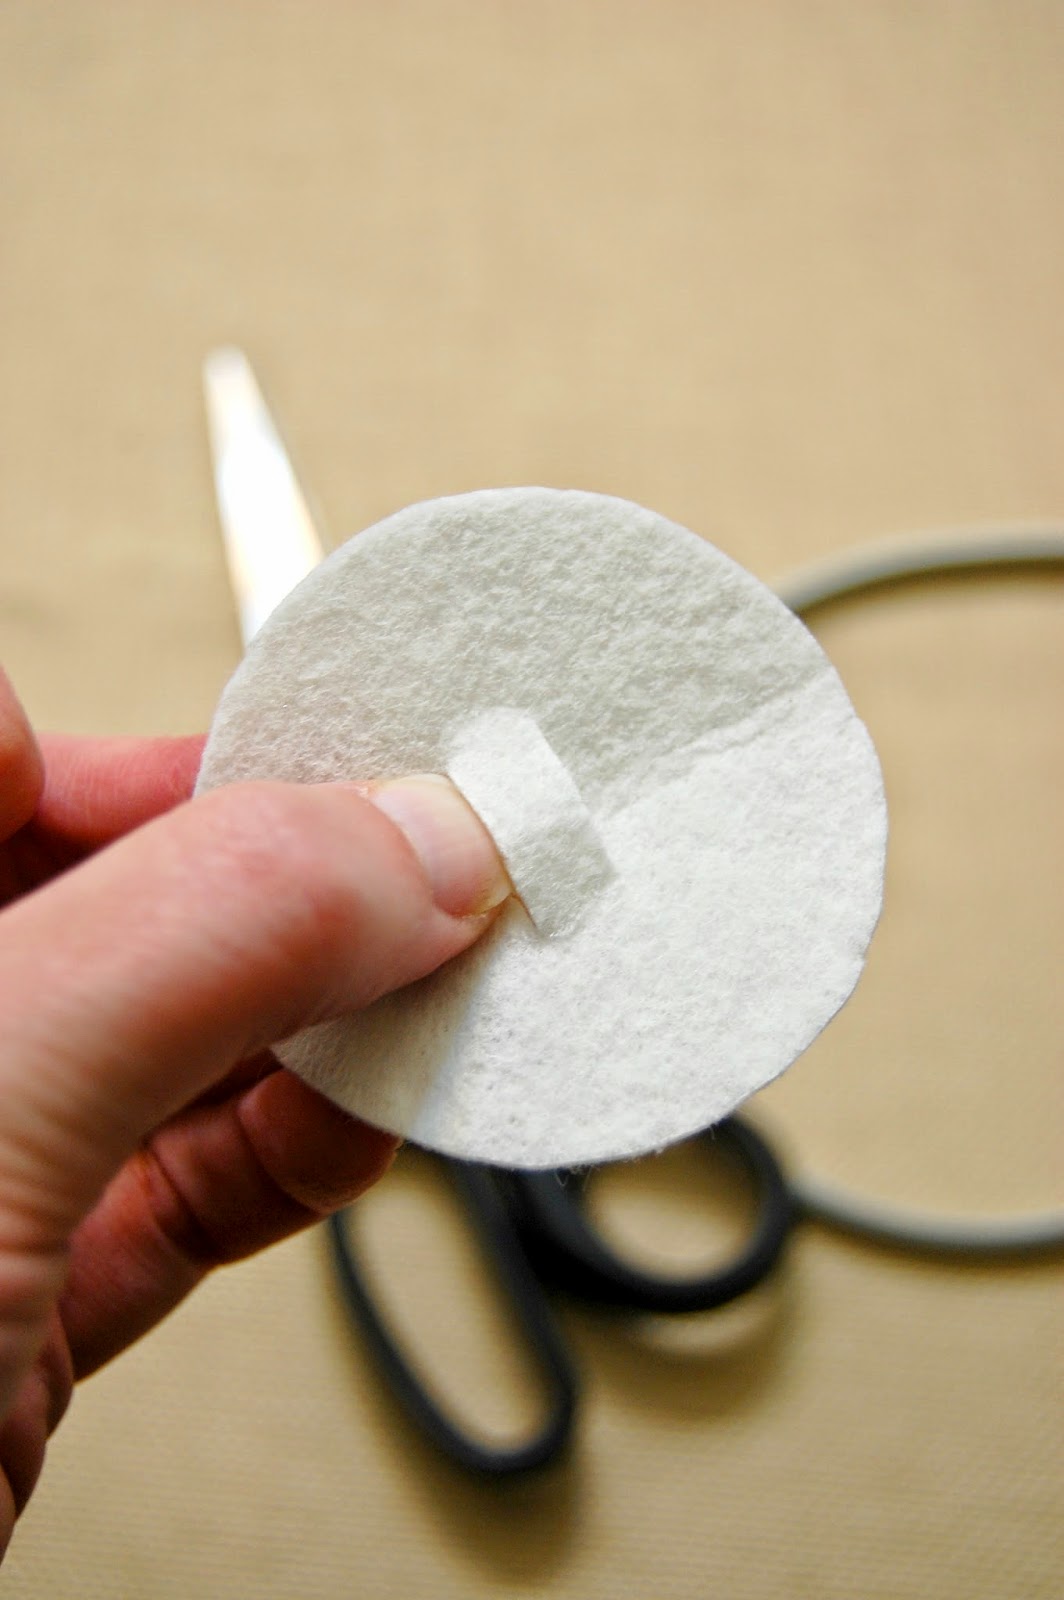
Fold one felt circle in half and cut 2 notches in the center wide enough to allow your headband to slide through.


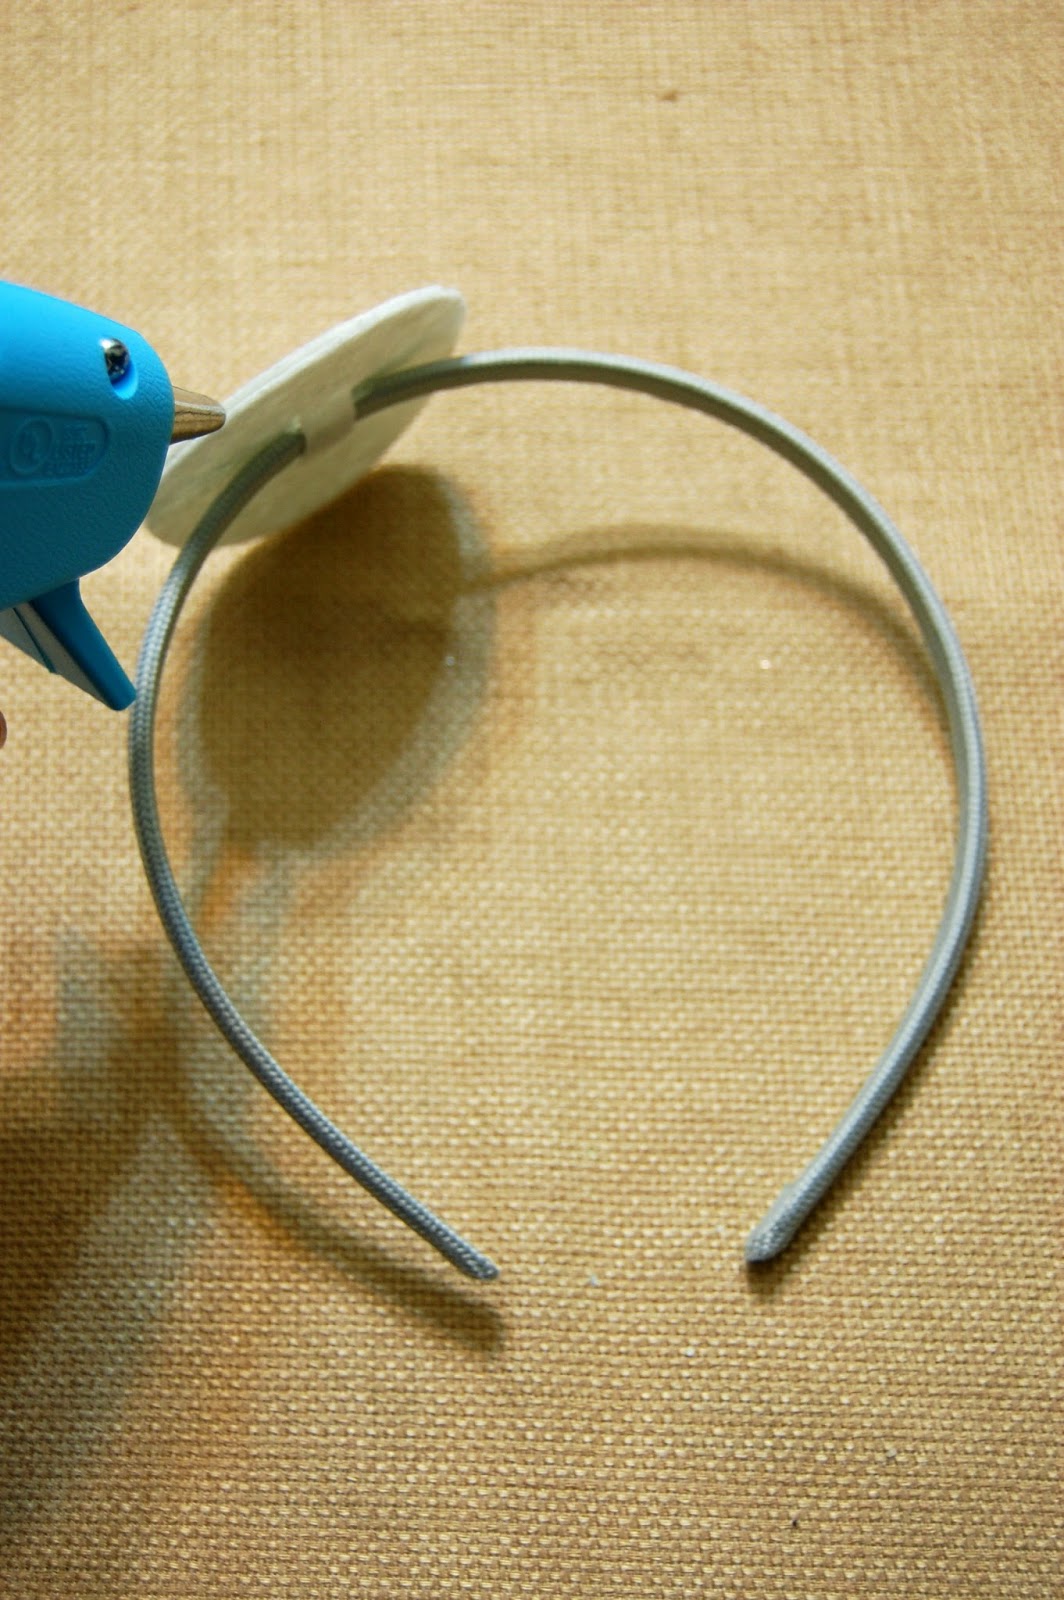
Feed the headband through the notches in the felt circle.


Position the circle where you want your crown to sit. I chose to place mine off center.


On the top of the headband, glue the second felt circle to the one with the notches to secure the headband.


Place a bead of glue around the outside of the felt circles that you glued together. Quickly wrap the glitter crown form to around the felt to create the circular crown shape.


Add a strip of glue down the side to secure the edge of the crown.

Viola! Your crown is ready to wear.


Me trying it on.


My adopted ragdoll cat, Sierra is the princess at our castle! If you want to adapt it for your pet, you could substitute a ribbon in place of the headband. This may also work better for a smaller child so that it can be tied under the chin.

Now that you have your crown you need a princess dress! Visit us at www.atutudes.etsy.com or www.facebook.com/atutudes to see what we have to offer. 

Follow our blog at www.atutudes.wordpress.com for more ideas and yummy recipes.
Instagram: www.instagram.com/atutudes
Twitter: @atutudes or www.twitter.com/atutudes
Pinterest: www.pinterest.com/atutudes


Friday, October 18, 2013

{13 Days of Handmade Halloween} Ghoulish Monster Hair Accessory and a Kid Friendly - Specimen Craft

Hello I’m Stephanie from SK Designs, and I am excited to have a guest spot on the 13
days of Handmade Halloween! Today I am going to be showing you how to make this
Ghoulish Monster Eye hair accessory! I also have a very simple craft project that your
kids can do while you work on your crafts, Specimen Halloween Craft, which I will post
at the end of the hair accessory tutorial!


 First of all you need to gather your supplies. These are the supplies I used for mine:


• Scissors
• Hot glue gun & Glue sticks
• 12 ½” Ribbon of your choice
• Barrette or headbands (your choice!)
• Googly craft eyes
• Feathers in assorted colors & sizes
• Needle & Thread (Don’t worry-you don’t need to be a seamstress to make these-
it’s very simple, I promise!)
• Embellishments (Mine are craft picks from the wedding section at Michaels)
• *Optional* Hot glue fingertip protectors

Ghoulish Monster Hair Accessory

Step 1: Take your ribbon, and cut 2 pieces to 5 ¼” and another small piece at 2”. Heat
seal the edges with a lighter so the ends won’t unravel. Fold your first 5 ¼” ribbon to
make a bow, making sure the seam is in the middle.


Step 2: Using your needle and thread, tie a knot in the end of the thread and pull it
through the center of your ribbon, securing it. Repeat this step with the second ribbon,
stacking it on top of the first. After you have your two bows stacked and sewn in the
middle go ahead and pull the needle and thread through BOTH layers of the bow to make
it sturdier. (Don’t worry if it doesn’t look perfect, nobody will see it later anyway!!) Set
aside.


Step 3: Take your googly eyes and pick which feathers you’d like to use - it’s your
project - it can be as wild or tame as you make it! You can play around with your feathers
before you glue them down to make sure it is just how you want it to look. Once you get
a look you like, go ahead and apply a SMALL dab of hot glue to the feather and attach
the other feathers together. I added feathers to the front AND back of my base feather.


Step 4: Taking your craft picks disassemble them so you have many smaller picks with
one or two rhinestones on them. Then I curled up the ends around a glue stick to tuck
away the sharp edges and give the pick a little more stability in the piece when I glue
them down. Once you have done this glue it to the back of the feather stack. Then glue on
the googly eye to the front of the stack. Set aside.


Step 5: Grab your barrette and open it up. Remove the inside piece and set aside. Then
take your bows and center them on the barrette, and use your needle and thread to attach
it to the center of the barrette. Secure the rest of the ribbon to the top of the clip with your
hot glue-making sure not to use too much so it dribbles out the sides. Then take the 2”
piece of ribbon and dab glue on the center inside the barrette to secure the ribbon with.
Replace the piece you pulled out earlier. Then flip the barrette over and put glue in the
center and wrap the edges of the ribbon up to the middle. (See, now you can’t even see
the stitching!)


Step 6: Now for the best part!! Take your googly eye and feather stack and glue them
down on to the top of the bow! Fill in feathers if necessary to cover glue spots. Let dry.
And Wha-La!! A Ghoulish Monster Eye hair accessory any ghoul girl would be thrilled
to wear!


*TIP* If you are using a headband instead of a hairclip, you can do the same steps as
above only attaching the pieces to the headband instead of the clip! If I am making hair
accessories for a small baby/toddler I like to make it as a bow, and then clip the bow to
the headband so the hair accessory can still be worn as the child gets older*


Specimen Halloween Craft {Kid Friendly}
For this kid friendly project you will need:


• *Hot glue gun & Glue sticks (This part YOU will have to do before hand, unless
your child is older and can do it without getting burned & is supervised for safety)
• Silicone craft molds –Mine are Martha Stewart that I got for ½ off at Joann’s.
• Scissors (Again, please make sure you cut out the paper unless your child is old
enough to handle scissors or has child approved scissors & is supervised)
• Stickers from Oriental Trading Company
• Scrapbook paper
• Small picture frame
• Non-toxic paint & Paintbrush
• Embellishments

If your kids are anything like mine they LOVE to do craft projects!! This one is so simple
and it doesn't take very long either; which is great if your child has a shorter attention
span (like my youngest!) This project is also great to do as a quick project for adults too.
Literally it only takes a few minutes and you’re done!

For this project we used small picture frames that hang in the bathroom, which I can switch out seasonally, you can use any frame for this project!


This is my little helper, Kate!


Step 1: Using your silicone mold squeeze some hot glue in to the mold to fill it up, set
aside for a minute and let harden. (It doesn't take long at all!!)


Step 2: Gather up all of your Halloween scrapbook paper or plain colored papers, and a
picture frame. Open the frame and remove the glass. With adult supervision, have your
child cut the paper down to fit inside the frame you have chosen for this project. Insert
the paper in to the frame; place the glass back inside, and close up the back. By doing
it like this, your child can decorate their paper and glue the 3D “specimens” on and you
will know your glass is safe, too!


Step 3: Have your child paint the dried glue with non-toxic paint. Then set it aside to dry.
(A hairdryer on low setting will help to speed up this process!)


Step 4: Using Halloween stickers, let your child decorate the paper any way they like.
Our stickers are from Oriental Trading Company. Add embellishments if desired, too!


Step 5: Glue the “specimen” on to the paper in the frame and set it out/hang it up for
Halloween!


And there you have it! A very simple craft project your kids can do!!


More from SK Designs:

Website: http://designsbysk.wix.com/skdesigns
Facebook: www.facebook.com/designsbysk
Instagram: Designsbysk
Pinterest: www.pinterest.com/stephknieriem
Blog: skdesigns1.blogspot.com


Bloggers using items from Oriental Trading were provided the products free of charge by the company and provided their own honest opinion.  Others may have a different opinion or experience with the product(s) listed above.  No other type of compensation was received.


Related Posts

Related Posts with Thumbnails